


Where lighting is concerned, a movement is underway to reduce energy consumption without affecting performance. You’ll notice 100-watt incandescent lightbulbs are no longer available for home use precisely for this reason. But instead of squinting at each other’s faces over the dinner table, alternative options have been developed. In our case, we’re interested in LED headlights.
But reduced energy usage isn’t your concern – not for your headlights or other automotive lights. No, it’s the improved light performance and the crystal clear white light you get from LED headlights. That’s why you want LED headlights.
It’s an easy decision. LED headlights for automotive use are simply the best. Upgrading to brighter lights doesn’t have the inherent risk of heat damage or discoloration that comes with swapping for brighter incandescent bulbs. Your visibility is almost guaranteed to be vastly improved. And, because of the low energy usage, you won’t see flickering lights when other high-consumption devices are used at the same time. That’s for you, audiophiles.
Installing LED headlights isn’t rocket science. With a few basic tools and some rudimentary mechanical knowhow, you’ll be able to change any bulb in your car to an LED headlight.
Installing LED Headlights
1. Select the Right Kit
Don’t skip over this step! It’s important that you understand this basic principle or you’ll have a 50/50 shot of ordering the wrong supplies.
There are two styles of headlights, and your car will have one of them. You’ll have either single-beam headlight bulbs or dual-beam headlights.
Single Beam – these bulbs are used for either low beam or high beam headlights, not both. That also means that each headlight assembly has two bulbs, one for each function. You’ll need two single-beam LED conversion kits if you want high-beam and low-beam LED headlights, unless you come across a kit that does both.
Dual Beam – the headlight bulb on each side serves the role of both high beam and low beam. Make sure you choose a dual-beam LED conversion kit that can function for both lighting roles.
You also need to know what bulb style your vehicle requires. The replacement LED headlights will fit into the same headlight housing as your current light bulbs. The replacements that you purchase need to precisely fit into the same hole, so the correct bulb size is critical. For example, if your vehicle uses an H11 headlight bulb from the factory, the replacement will need to be an H11 LED headlight bulb.
2. Prep for Installation
Don’t be one of the people who jumps the gun and tears into your project without a plan. It’s going to take you longer to get it right, and the end result might be a little disappointing.
Before you pull out your old headlights, you can use them as a template for the headlight aim (assuming it’s proper already). Park roughly 20 feet from your garage door, fence, or from your house with your headlights on. Mark the height of your headlight beams, preferably with a removable item like tape. This is your template to confirm your headlight aim with your new headlights.
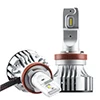
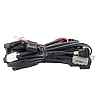
Get acquainted with your LED headlight kit. Inside, there should be two bulbs, two ballasts, wiring, and terminated connectors. You’ll also need to secure the ballasts and wiring so they aren’t susceptible to damage. Self-tapping screws and a drill can be used to secure the ballasts for a clean look, or you can use two-sided tape. But, in a pinch, zip ties will do just fine.
3. Remove Your Headlight Bulbs
Time to get to work. Pop your hood and pull the headlights out. Sounds simple enough, doesn’t it? Well, it could be a little more challenging than you think.
Locate the back of the headlight bulb that you’re changing. There’s going to be some sort of a wiring connector attached to it that you’ll need to remove. If the connector hasn’t been removed in some time, a flat screwdriver may be necessary to work the clip and wiggle the connector free.
Most headlight bulbs are held in by plastic tabs, secured by twisting the bulb into place like a screw. It’s a quarter turn at most. Turn the headlight bulb counterclockwise to release it. It’s important to do this gently – if you break the headlight inside the housing, you’ll need to pull the whole thing to shake out the broken glass.
If you see a metal base on the headlight assembly, secured by a tensioned wire, stop! This isn’t a twist-out situation. That wire secures the headlight in place, and if you break something now, you’re replacing the headlight housing. Press down on the end of the wire (there will be a small loop), and unhook the wire. Now the headlight will slide right out of the housing.
4. Install the LED Headlights
This part is virtually the last step in reverse. You’re going to install the LED headlight bulbs in exactly the reverse order of the removal.
Whenever you’re handling a headlight bulb, whether it’s halogen, HID, or LED, always wear protection! In addition to protecting you from unforeseen accidents, it’s for the bulbs. Ideally, clean cotton gloves should be worn to handle the new bulbs, but a clean rag or rubber gloves would work as well. If you get your fingerprints on the bulbs, the oils can cause them to burn out prematurely.
As you twist your headlights into place, don’t try to overtighten them. They need to be secure, but don’t chance breaking your LED headlights. Only use your hands, never a tool to assist.
5. Connect the Ballast
Some LED kits will have built-in ballasts on the bulbs, but a quality kit will usually have separate ballasts to connect. The installation is quite straightforward.
There are two connectors on the ballast: one end attaches to the bulb and one end connects to the original vehicle wiring. You can’t get these backwards because of the style of connectors. Fully seat the connectors on both sides. It may click in some cases, but always give a gentle tug to make sure it’s fully seated.
6. Secure the Ballast
You’re almost there. Now it’s just a matter of tying everything up.
It’s important to mount the ballast somewhere secure. If the ballast is bouncing around, it can get damaged, the wiring can pull or fray, or the connectors can work their way out if they aren’t secure.
For a professional look, you’ll want to mount the ballast cleanly on the inner fender. Find a flat location for the ballast to mount, then mark the mounting holes with a Sharpie. Drill pilot holes then secure it with metal screws. You can also forego the drill and use self-tapping screws.
If you’d prefer not to drill into your car, you can mount the ballasts using two-sided tape. This way, you can mount the ballast on the back of the headlight assembly or somewhere else if the fender isn’t an ideal location. If that’s the option you choose, prep the surface with an alcohol swab and let it dry before you stick the two-sided tape to the inner fender. The last thing you want is the ballast coming loose and swinging around near your fan belt or other moving parts.
In a pinch, you can secure the ballast using zip ties. They aren’t ideal because of the movement and vibration they allow, but they can work if need be. Choose as rigid a mounting location as possible.
7. Test Your New LED Headlights
Fire up your car and try out your headlights. If you’ve done it right, your LED headlights will fire right up brightly. If they don’t, retrace your steps. Most likely, you have a loose connection.
Now, check your headlight aim. Park at exactly the same location as your previous test. With your headlights on, check the aim compared to the mark you made on the wall. If it’s off, adjust it right away. Most headlight aiming can be done with just a Phillips screwdriver, but your vehicle might be different. Even though the bulbs are the same style, the light dispersion can be a different pattern. Improperly aimed headlights can draw flashes from oncoming traffic as well as red and blue flashing lights behind you J. Especially with bright LED headlights, you need to make sure the aim is correct.
Once your brand new LED headlights are adjusted, you’re ready to hit the road.
Like LED headlights, other bulbs in your vehicle can be changed to LED bulbs. Fog lights, for example, often use exactly the same kit as headlights. Other bulbs, though, are different.
Marker lights, turn signal lights, brake light bulbs, reverse lights – they can all be changed out for LED headlights. The benefits are improved clarity, exceptionally long life (you’ll never have to change the bulb again), and the ability to choose a different color.
Interior lights are the same idea. You can take apart any feature inside your vehicle that has lighting and replace the bulbs with LEDs. If you’re changing interior lights, note that you’re going to need a bit of technical skill. Many of the bulbs are soldered into circuit boards. You’ll need to have the right equipment to remove and re-solder your LED into the board. Again, this option is fantastic if you want to change the interior light color for a custom look.